
Overview
Microstock refers to a business model in the stock photography, illustration, and media industry where creators (photographers, designers, videographers) upload their work to online platforms and license it to customers for a small fee (“micro” pricing). These platforms aggregate content from thousands of contributors and make it available for purchase by individuals, businesses, or media outlets.
One of the biggest problems with stock photo metadata is that most of the user flow is manual and requires human intervention.
StockPilot
Adobe Stock is a popular platform for stock photography and illustration where creators can upload their work and license it to customers. It provides a rich set of metadata fields to describe the stock photo.
However, manually entering metadata for each stock photo can be time-consuming and error-prone, especially when dealing with a large number of photos.
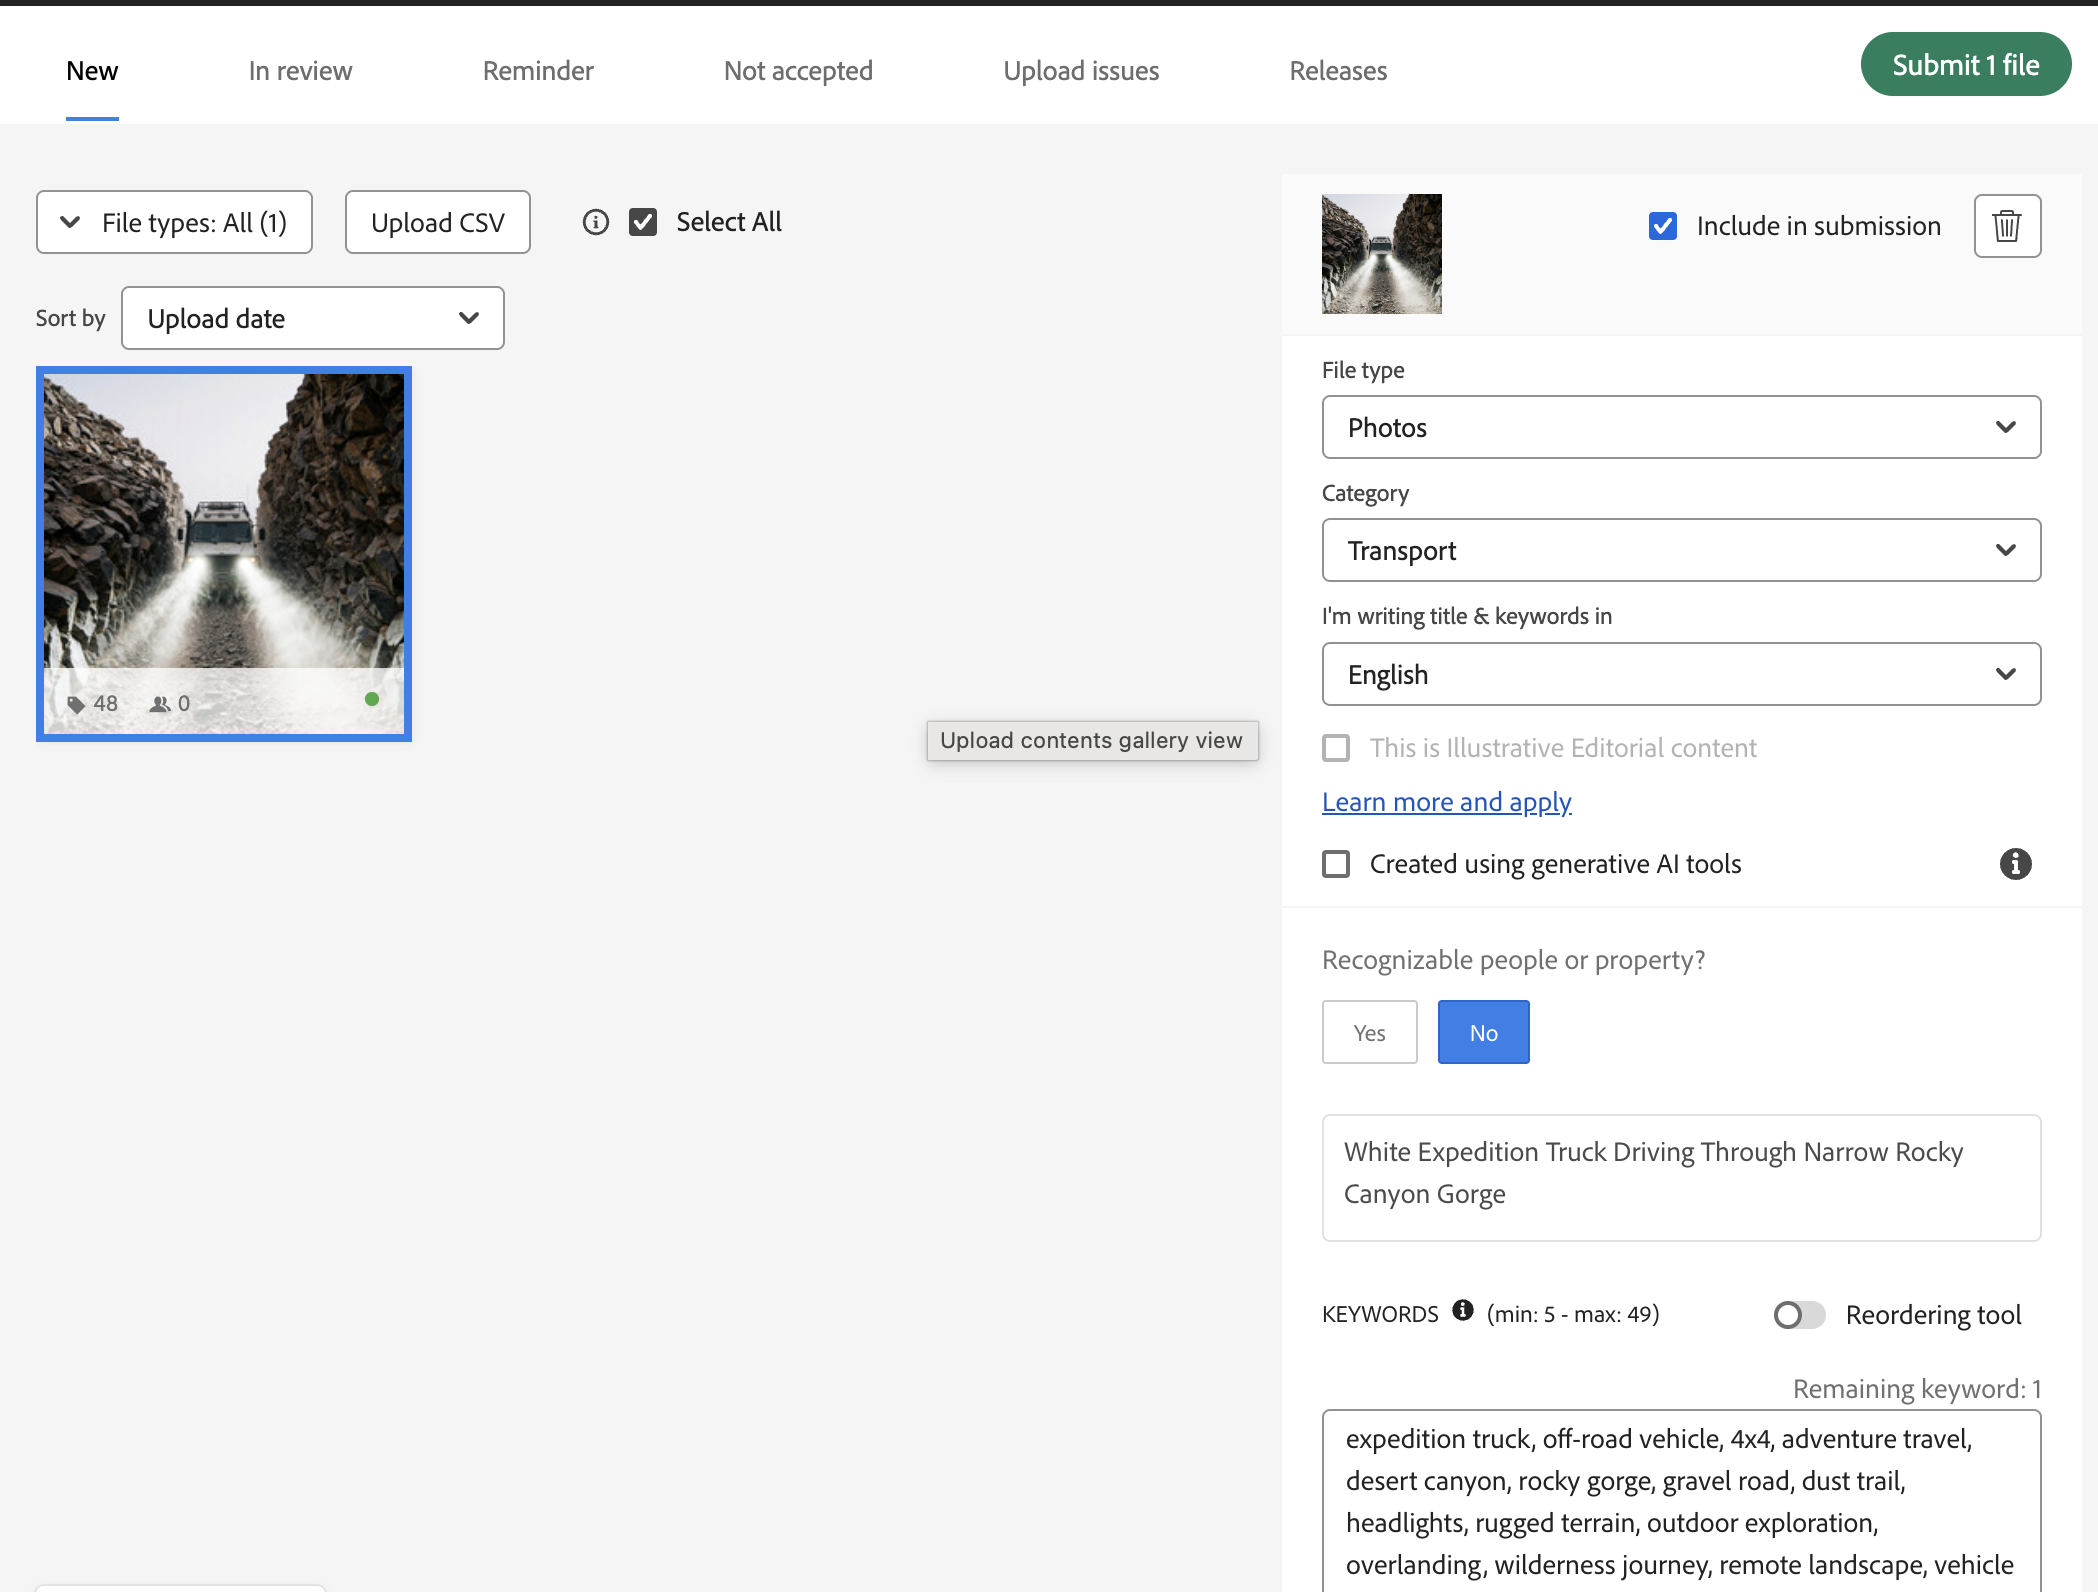
In this article, we will build StockPilot, a tool that converts stock photos into Adobe Stock-ready metadata using three stateless agents, AI models for inference, and GridDB as the data bus between steps. With this approach, we can automate the metadata generation process and reduce the need for human intervention.
How to run
- Clone the repository and install dependencies:
$ git clone https://github.com/junwatu/mstck-ageai
$ cd mstck-ageai
$ cd apps
Make sure you have Node.js installed, then install all the dependencies:
$ npm install- Set up the environment variables:
# Change this to your desired port and host
$ PORT=3000
$ HOST=0.0.0.0

# GridDB Cloud Web API
$ GRIDDB_CLOUD_URL=
$ GRIDDB_USERNAME=
$ GRIDDB_PASSWORD=

# GMI Cloud will provide AI models
$ GMI_CLOUD_API_KEY=
For more information on the environment variables, read this article.
- Start the application with this command:
$ npm run start
Go to the application at http://localhost:3000 and start selecting one of the images, submit, and get the metadata results. You can also get the CSV file on the same page.
System architecture
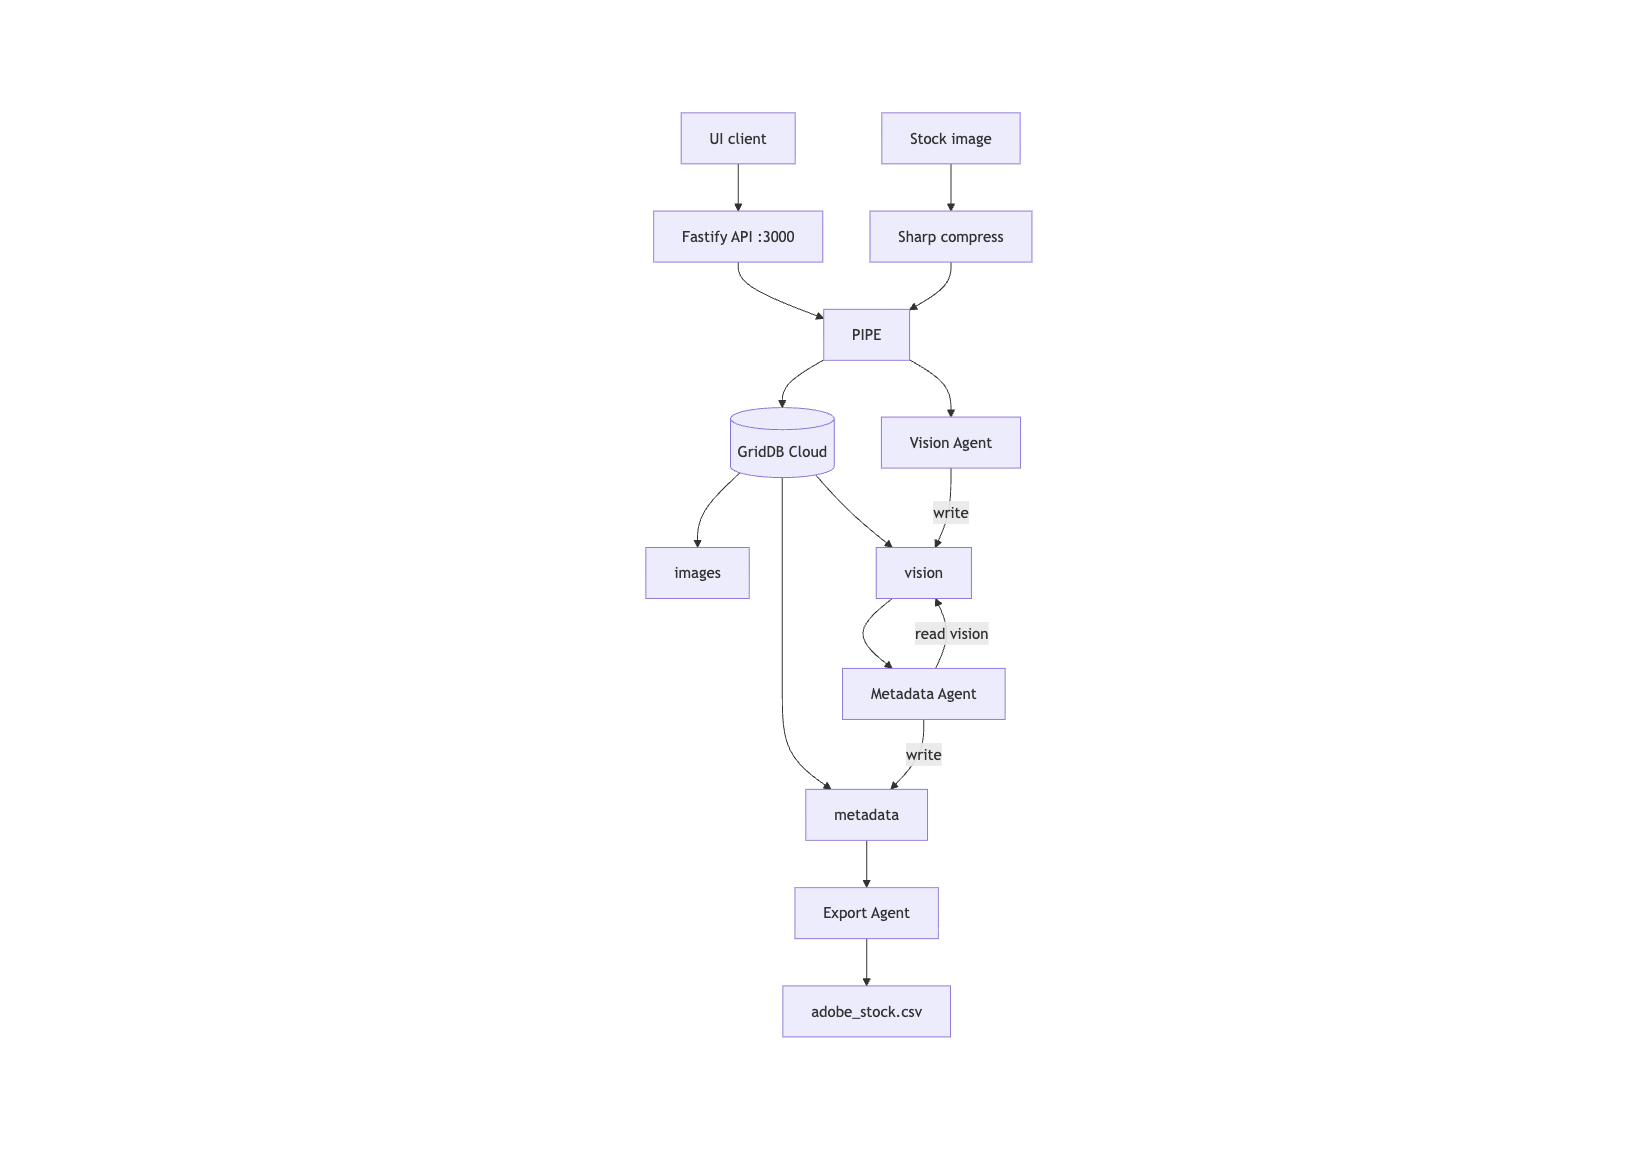
Basically, system architecture follows the pipeline flow as follows:
1. User Selects Image. Pipeline will assign a UUID for the selected image, save filename and image_path to the images container in GridDB.
2. Compress. Resizes/compresses the image before sending it to the Vision Agent.
3. Vision Agent. This agent uses a multimodal model that analyzes the image, and the result is written to the vision container in GridDB.
4. Metadata Agent. Text model reads vision from GridDB, generates title, keywords, and category, then writes metadata to the metadata container in GridDB.
5. Export Agent. This agent doesn’t use an LLM. The task is to append one row to adobe_stock.csv.
6. Result. The result is shown on the client UI.
Software Stack
Node.js
You can install Node.js from the official website: https://nodejs.org. Use the LTS version.
GridDB
Sign Up for GridDB Cloud Free Plan
If you would like to sign up for a GridDB Cloud Free instance, you can do so at the following link: https://form.ict-toshiba.jp/download_form_griddb_cloud_freeplan_e.
After successfully signing up, you will receive a free instance along with the necessary details to access the GridDB Cloud Management GUI, including the GridDB Cloud Portal URL, Contract ID, Login, and Password.
GridDB WebAPI URL
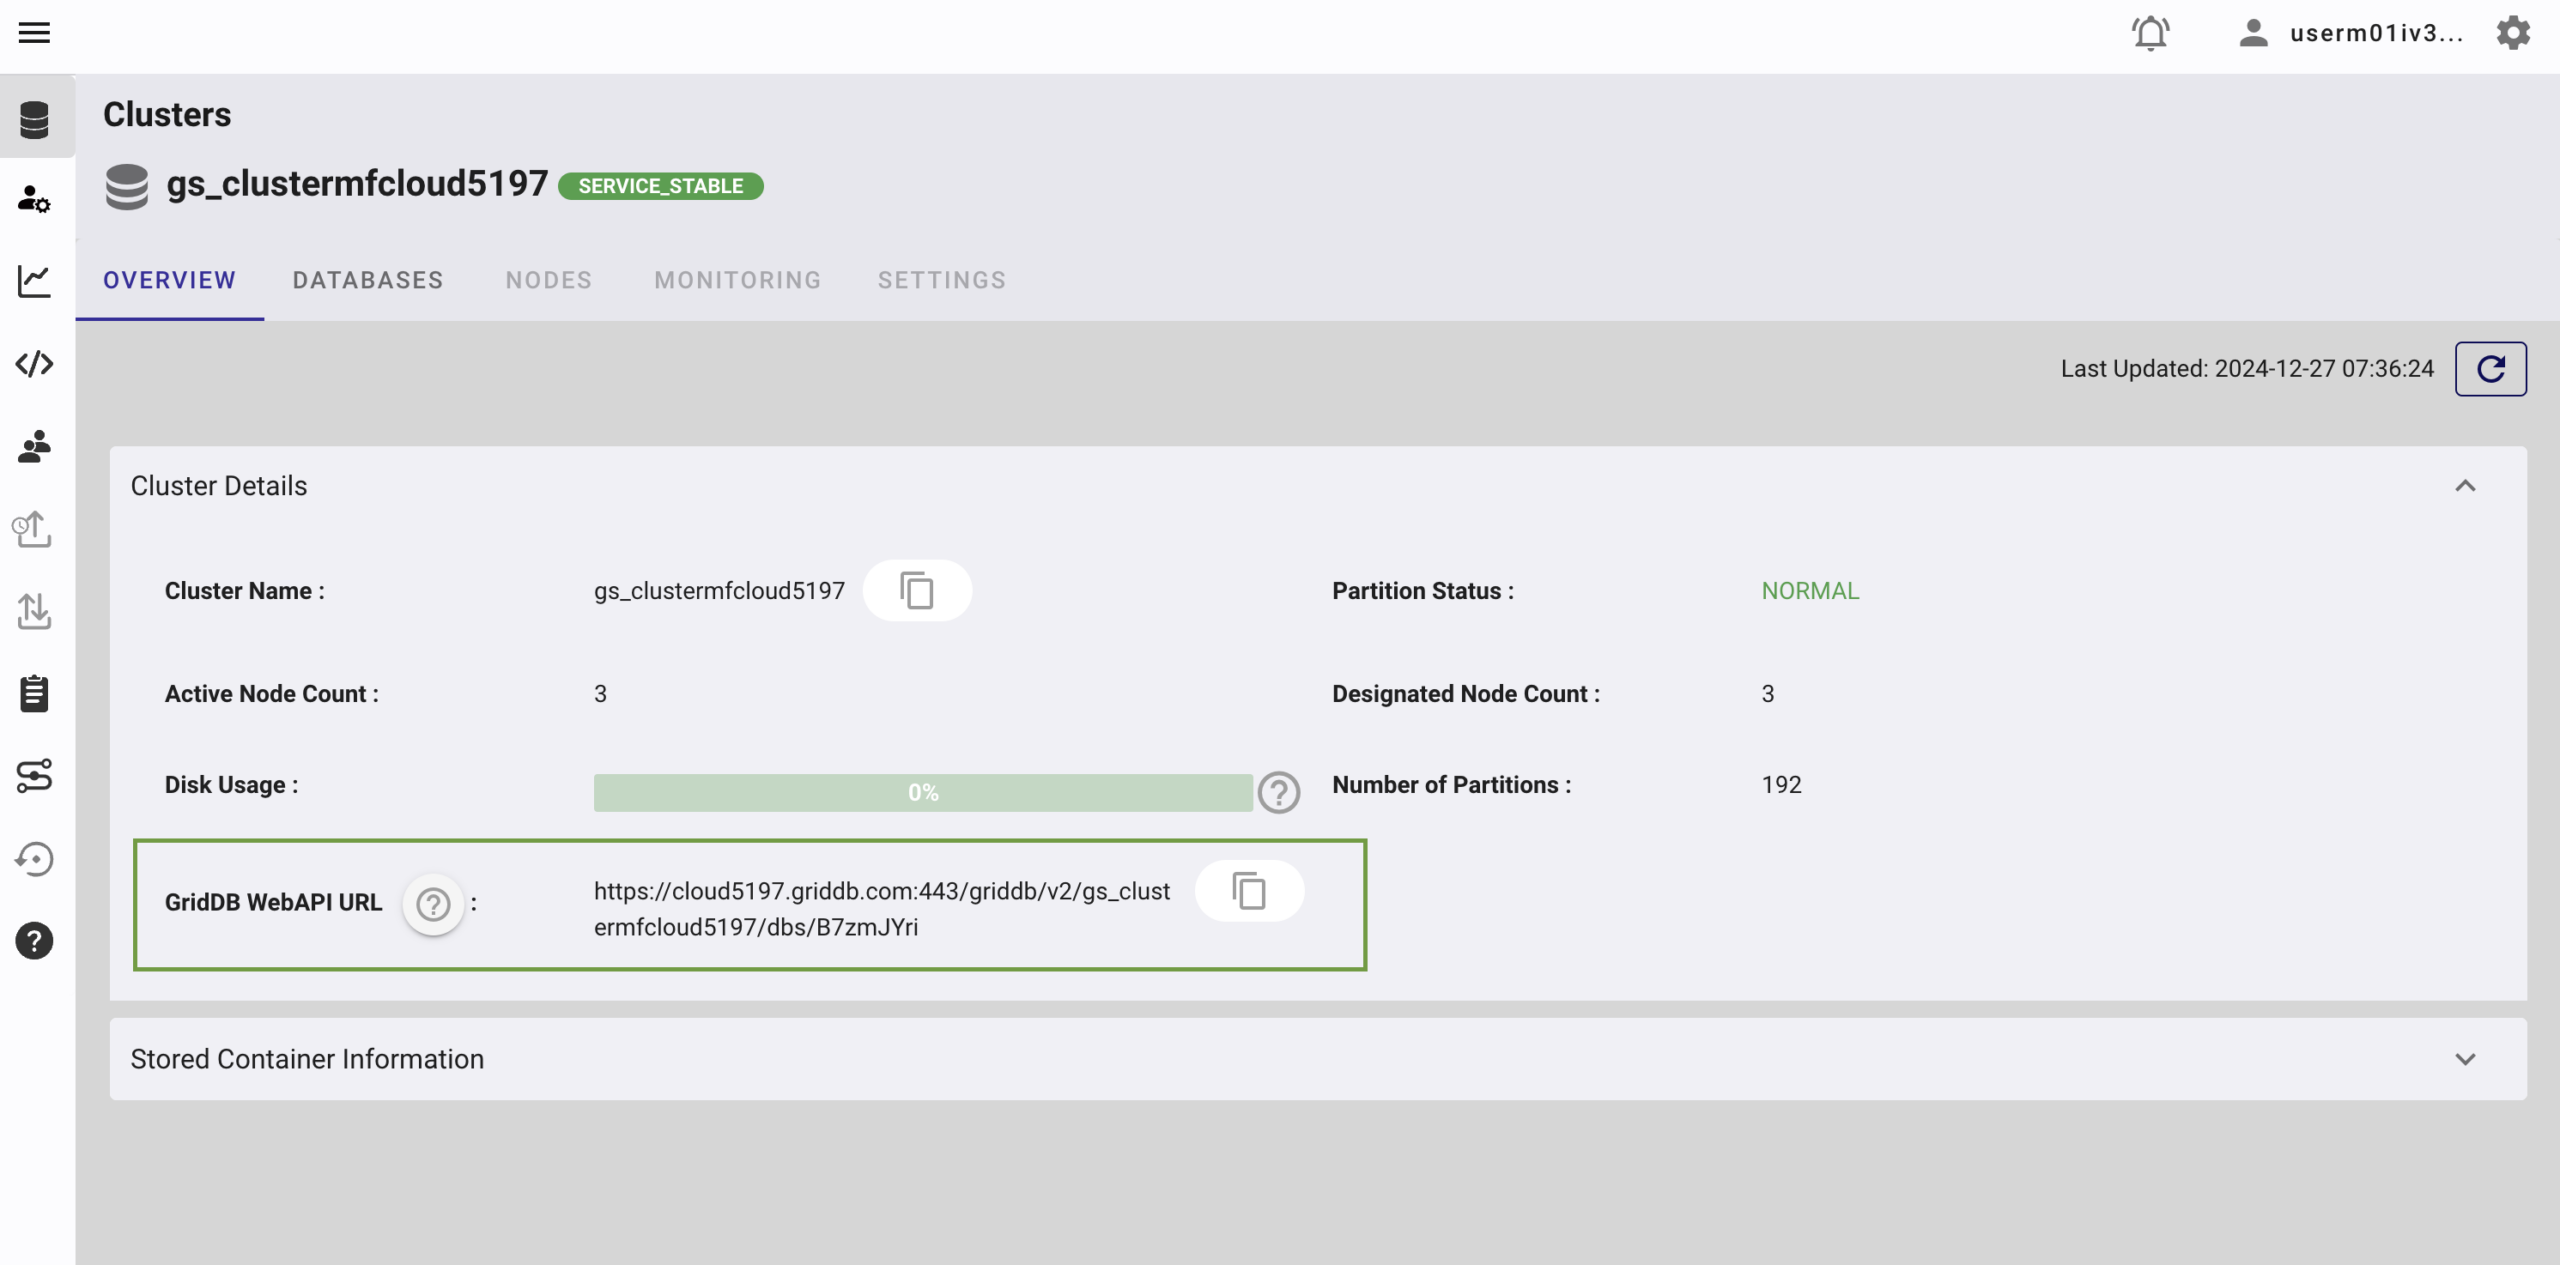
Go to the GridDB Cloud Portal and copy the WebAPI URL from the Clusters section. It should look like this:
GridDB Username and Password
Go to the GridDB Users section of the GridDB Cloud portal and create or copy the username for GRIDDB_USERNAME. The password is set when the user is created for the first time. Use this as the GRIDDB_PASSWORD.
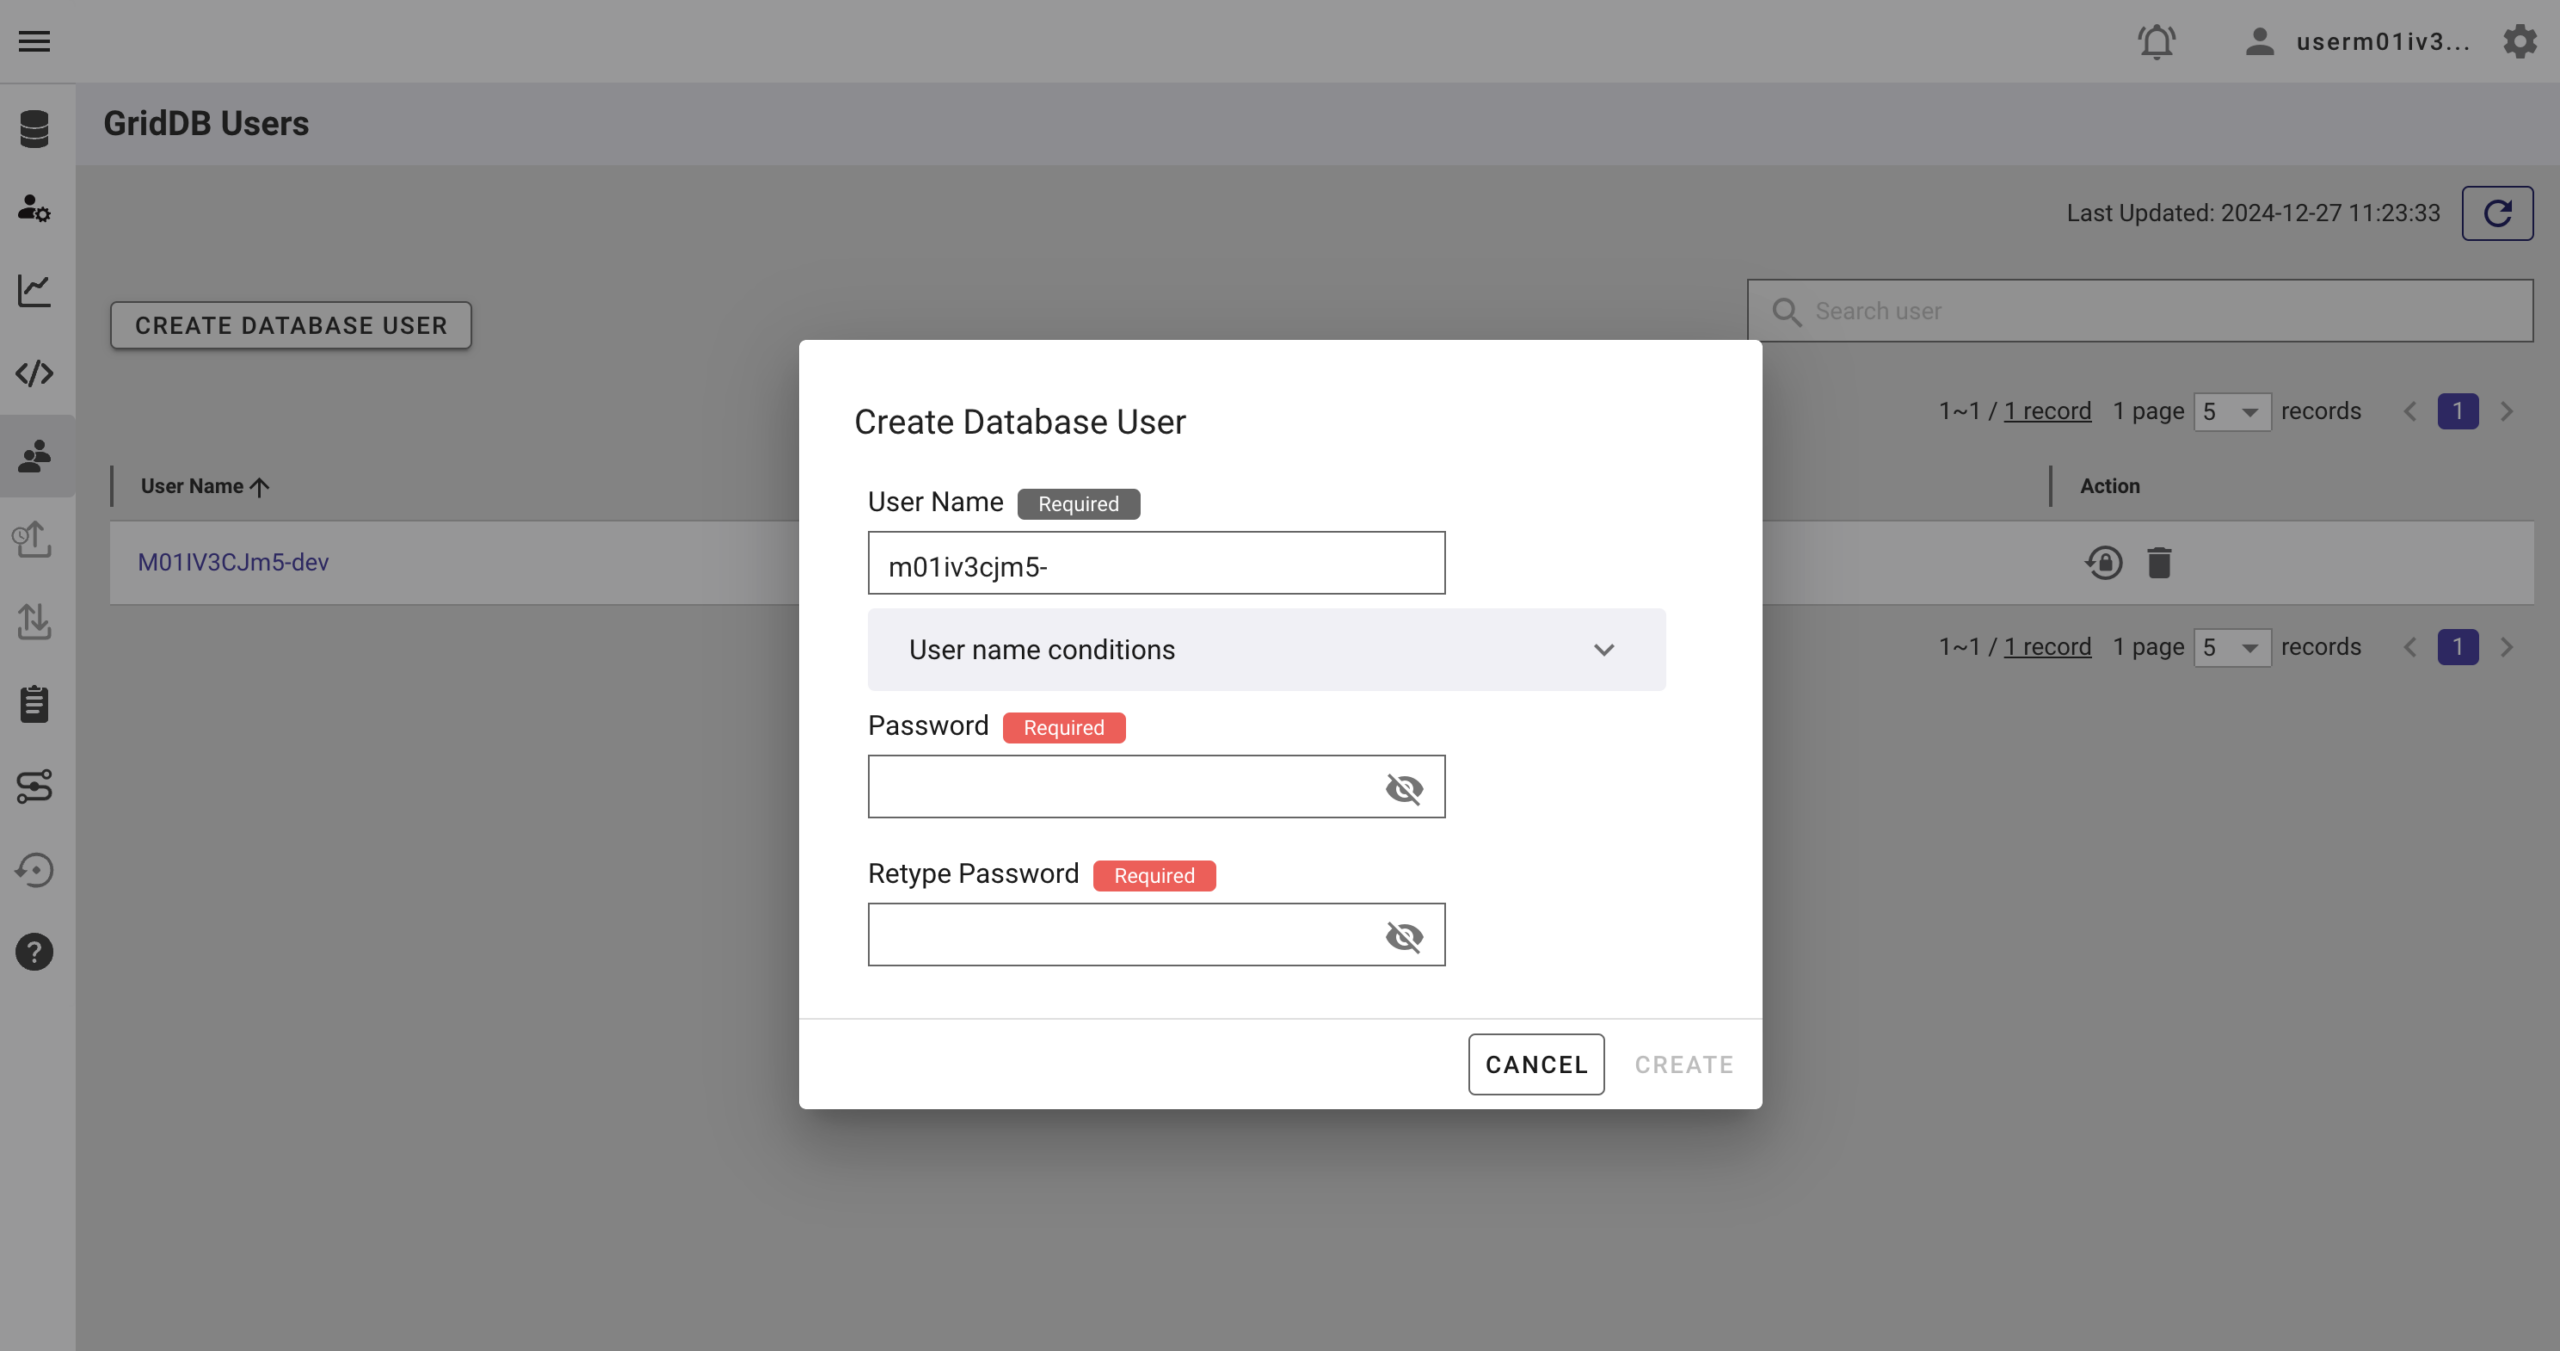
For more details, to get started with GridDB Cloud, please follow this quick start guide.
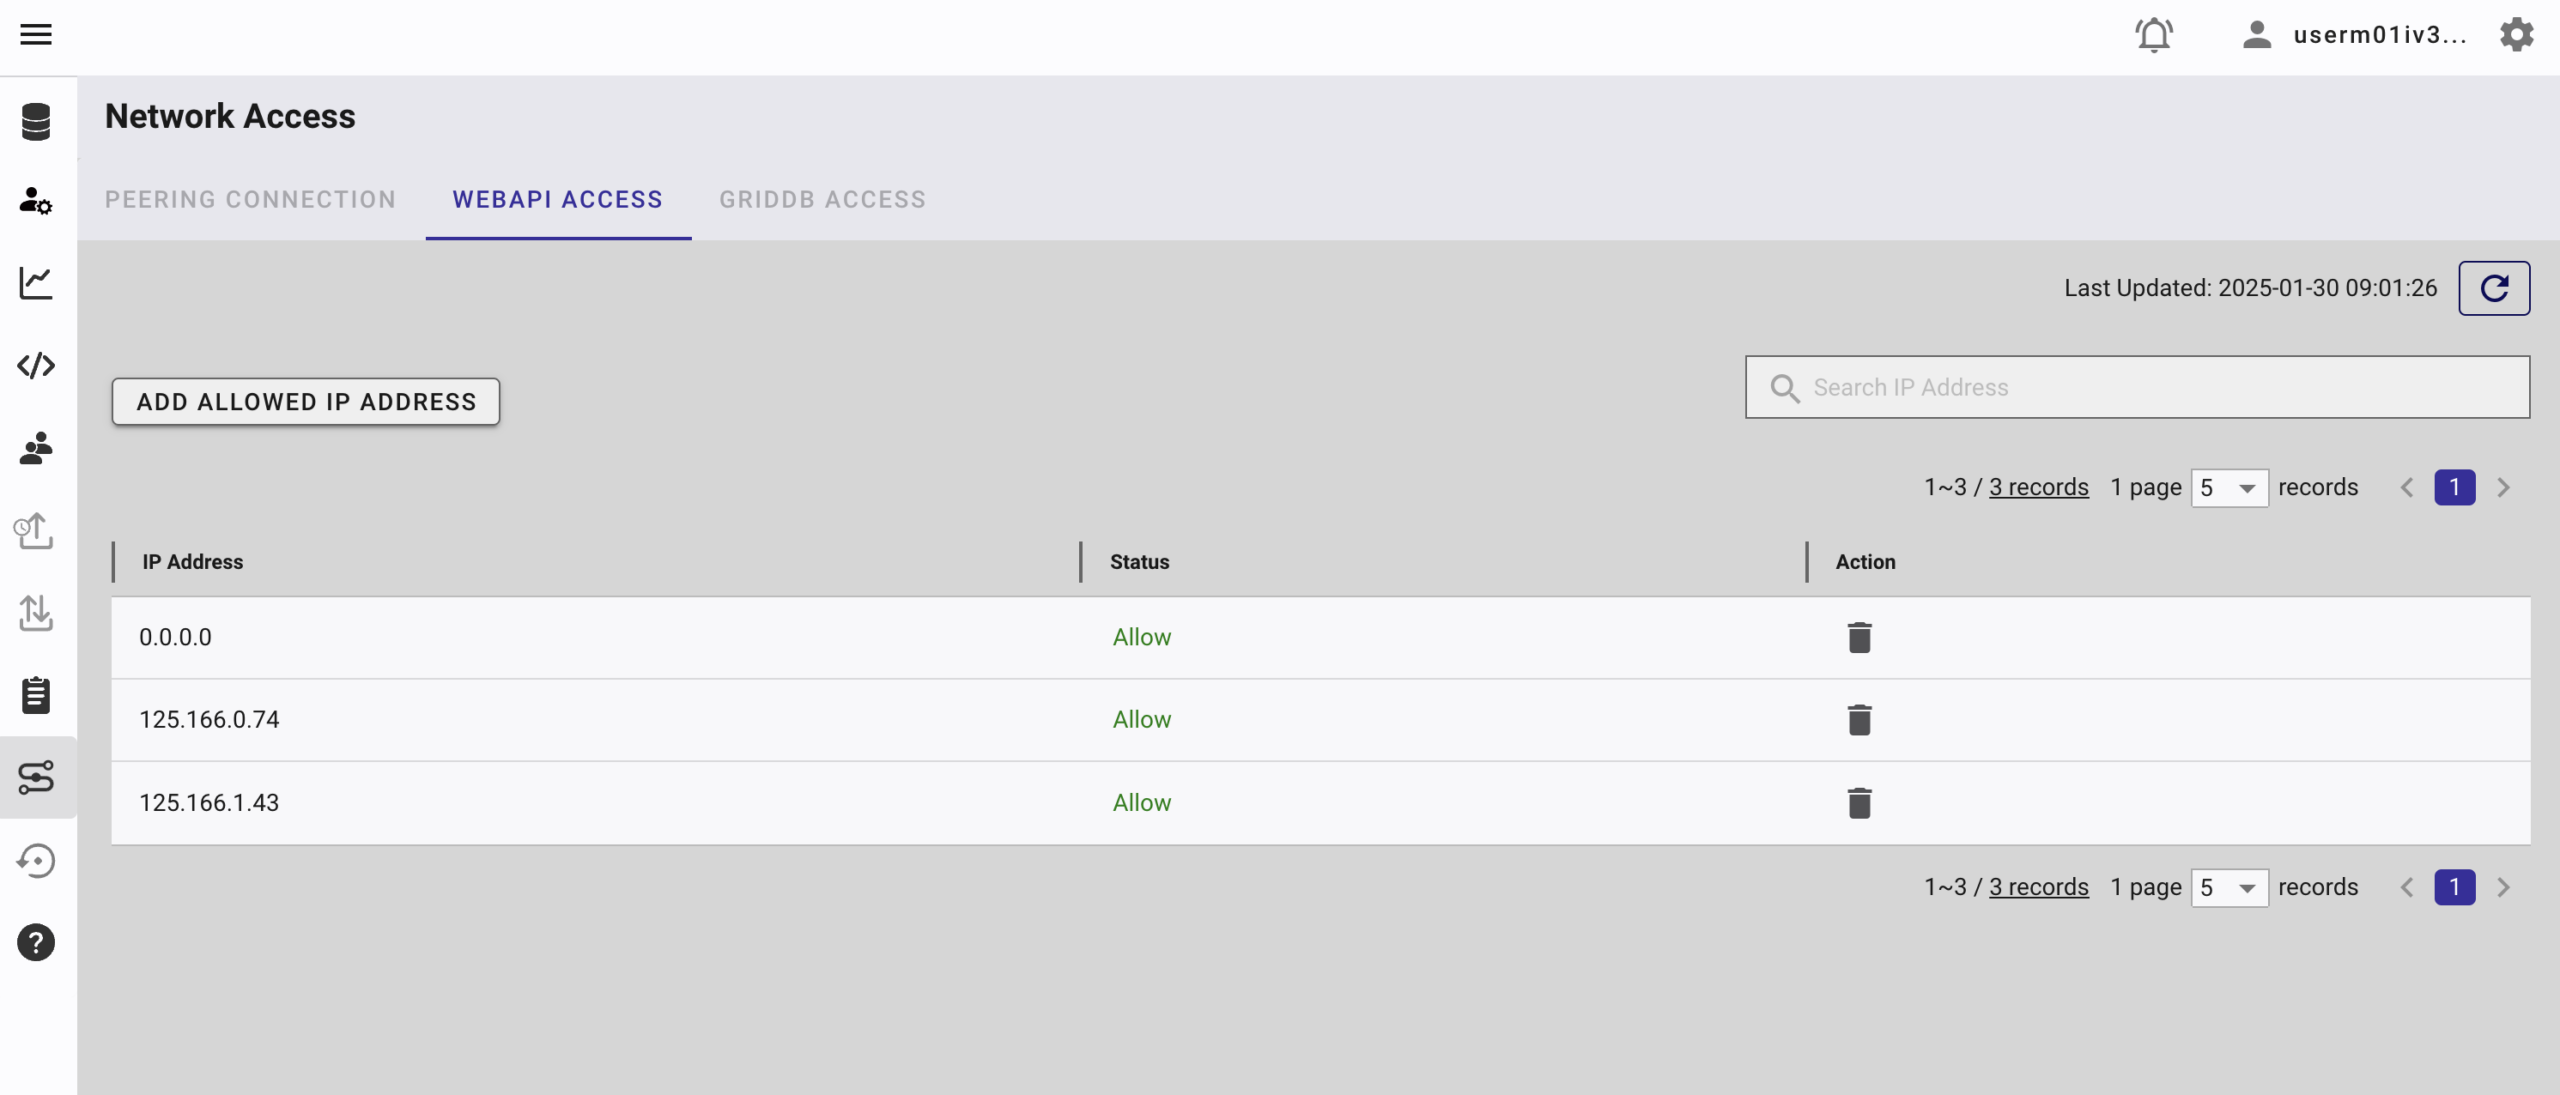
IP Whitelist
When running this project, please ensure that the IP address where the project is running is whitelisted. Failure to do so will result in a 403 status code or forbidden access.
You can use a website like What Is My IP Address to find your public IP address.
To whitelist the IP, go to the GridDB Cloud Admin and navigate to the Network Access menu.
GMI Cloud
GMI Cloud is an inference provider that provides access to AI models. We will use two models: Qwen/Qwen3.5-35B-A3B for Vision and Qwen/Qwen3.6-Plus for Metadata.
You need an API key from GMI Cloud to use these models. Go to this GMI Cloud API key page to get one.
Technical implementation details
AI Agents
In this project, we need three agents: Vision, Metadata, and Export.
This is the summary of the agents and their responsibilities:
| Agent | Model (GMI Cloud) | GridDB | Output |
|---|---|---|---|
| Vision | Qwen/Qwen3.5-35B-A3B |
writes vision |
description, objects, scene, style, colors, concepts, mood |
| Metadata | Qwen/Qwen3.6-Plus |
reads vision, writes metadata |
title, description, category (1-21), keywords (max 49) |
| Export | None (no LLM) | reads metadata (in pipeline) |
CSV: Filename, Title, Keywords, Category, Releases |
For more details, see the individual agent sections below.
Vision Agent
This agent function is responsible for analyzing an input image (provided as a base64-encoded) and generating structured metadata using an AI model (e.g., Qwen/Qwen3.5-35B-A3B). The output is saved to vision container in GridDB.
The main code for this agent is shown below:
export async function runVisionAgent(
  client: OpenAI,
  imageDataUrl: string,
  context: VisionAgentContext,
): Promise<VisionResult> {
  const { visionModel } = loadModelConfig();
  logAgent('vision', `running with ${visionModel}`);

  const vision = await chatJson(
    client,
    visionModel,
    [
      {
        role: 'system',
        content:
          'You analyze stock photos for metadata generation. Return JSON only with keys: description, objects, scene, style, colors, concepts, mood.',
      },
      {
        role: 'user',
        content: [
          { type: 'text', text: 'Analyze this stock photo.' },
          { type: 'image_url', image_url: { url: imageDataUrl } },
        ],
      },
    ],
    VisionSchema,
    { maxTokens: 800, label: 'vision-agent' },
  );
The code above will scan the image, stores the generated metadata in GridDB for the next agent (Metadata Agent) to use. The agent’s JSON response is validated against VisionSchema and includes:
{
  description: string;  // e.g., "A serene mountain landscape at sunset"
  objects: string[];    // e.g., ["mountain", "lake", "trees"]
  scene: string;        // e.g., "outdoor, nature"
  style: string;        // e.g., "photorealistic"
  colors: string[];     // e.g., ["blue", "orange", "green"]
  concepts: string[];   // e.g., ["tranquility", "adventure"]
  mood: string;         // e.g., "calm"
}
The schema will make sure that the data output is always valid and structured.
We use Qwen 3.5 for this agent. This model is an open-weight multimodal AI model that suits our needs for stock photo analysis.
Furthermore, because the model is open-source, you can install it locally and run it on your own hardware. For more details, see the Qwen 3.5 official repository.
Metadata Agent
The Metadata Agent takes the output from the Vision Agent and the original image filename, then generates Adobe Stock-ready metadata using an AI model. The result is saved to GridDB for the next agent (Export Agent).
The main code for this agent is shown below:
export async function runMetadataAgent(
  client: OpenAI,
  input: MetadataAgentInput,
): Promise<MetadataResult> {
  const { metadataModel, keywordLimit } = loadModelConfig();
  logAgent('metadata', `running with ${metadataModel}`);

  const vision = await getVisionRecord(input.griddb, input.imageId);

  const metadata = await chatJson(
    client,
    metadataModel,
    [
      {
        role: 'system',
        content: `You generate Adobe Stock metadata.
Use the filename exactly as provided — do not invent a new filename.

${CATEGORY_SELECTION_RULES}

Select exactly one category number from this list:
${CATEGORY_PROMPT_LIST}

Return JSON with: title, description, category (number), keywords (max ${keywordLimit} strings).`,
      },
      {
        role: 'user',
        content: `Filename: ${input.filename}\nVision analysis:\n${JSON.stringify(vision)}`,
      },
    ],
    MetadataSchema,
    { maxTokens: 1000, label: 'metadata-agent' },
  );

  await saveMetadataRecord(input.griddb, input.imageId, metadata);
  return metadata;
}
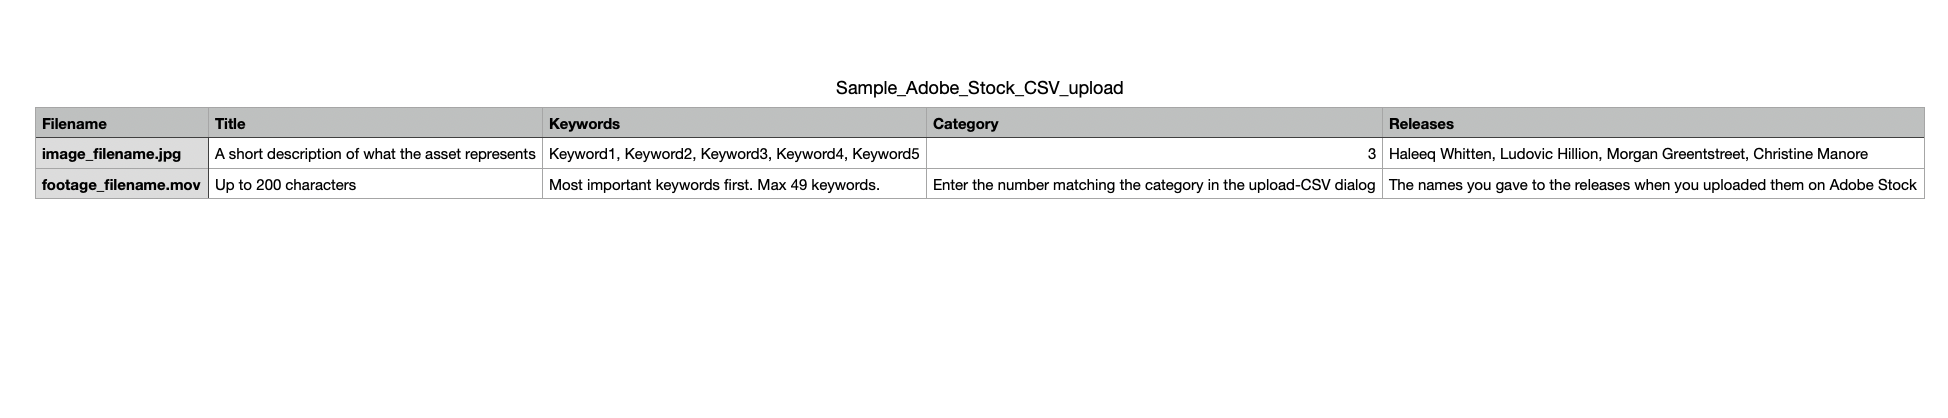
The system prompt defines the metadata generation rules to ensure the output conforms to Adobe’s CSV format.
Here is an example of the real sample of Adobe Stock metadata:
One important thing to note is that the category list is fixed and predefined. So the model shouldn’t generate categories that are not in the list.
The file categories.ts contains the predefined list of categories that was manually taken from the Adobe Stock category list.
export const ADOBE_CATEGORIES = [
  'Animals',
  'Buildings and Architecture',
  'Business',
  'Drinks',
  'The Environment',
  'States of Mind',
  '...'
] as const;
The following example demonstrates how this agent works:
const metadataResult = await runMetadataAgent(openaiClient, {
  imageId: "123e4567-e89b-12d3-a456-426614174000",
  filename: "golden-retriever.jpg",
  griddb,
});
This would generate metadata like:
{
  "title": "Golden Retriever Playing Fetch",
  "description": "A golden retriever joyfully leaps to catch a tennis ball in a green park.",
  "category": 5,  // e.g., "Animals"
  "keywords": ["dog", "golden retriever", "play", "fetch", "park", "summer", "happy"]
}
Then, the output metadata is written to the metadata container in GridDB.
Export Agent
This agent takes the metadata generated by the Metadata Agent and exports it to a CSV file formatted for Adobe Stock uploads.
The main code for this agent is shown below:
export function runExportAgent(
  rows: ExportRow[],
  options: { outputDir?: string } = {},
): ExportResult {
  const outputDir = options.outputDir ?? resolve(appsRoot, 'output');
  mkdirSync(outputDir, { recursive: true });

  const csvPath = resolve(outputDir, 'adobe_stock.csv');
  const lines = [CSV_HEADER, ...rows.map(toCsvRow)];

  writeFileSync(csvPath, `${lines.join('\n')}\n`, 'utf8');

  logAgent('export', `wrote ${csvPath}`, { rows: rows.length });

  return {
    csvPath,
    exported: rows.length > 0,
    rowCount: rows.length,
  };
}
This agent will create a CSV file from the pipeline result and save it to the output directory.
The CSV includes columns for Filename, Title, Keywords, Category, and Releases. Pay attention to the filename column; do not change it because Adobe will use it to map to the image on Adobe Stock with CSV data.
GridDB
StockPilot is a three-agent pipeline, but the agents do not call each other directly. GridDB Cloud here sits between agents like a bus data line.
Here is the data flow:
- Each image gets a UUID (
image_id). - The pipeline registers it in
images. - Vision Agent writes
vision. - Metadata Agent reads
visionfrom the database (not from memory), then writesmetadata. - Export Agent still builds the CSV from the pipeline result, but every AI step is persisted.
So, all containers read and write to GridDB Cloud using image_id as the key and every agents data is persisted in the database.
| Container | Row key | Written by | Read by |
|---|---|---|---|
images |
image_id |
Pipeline | Not read by an agent |
vision |
image_id |
Vision agent | Metadata agent |
metadata |
image_id |
Metadata agent | Export (via pipeline) |
All the containers has schemas defined for images, vision, and metadata. You can look at the schema definitions for all containers in the apps/server/src/schemas directory.
For example, the vision schema is defined in apps/server/src/schemas/vision.ts.
{
  image_id: "STRING",
  description: "STRING",
  objects: "STRING",  // JSON-encoded array
  scene: "STRING",
  style: "STRING",
  colors: "STRING",   // JSON-encoded array
  concepts: "STRING", // JSON-encoded array
  mood: "STRING",
  created_at: "STRING",
}
GridDB doesn’t natively support arrays or nested objects, so arrays (e.g.,colors, objects) are JSON-encoded before storage and decoded when retrieved.
The griddb-store.js is the central code for GridDB in this project. It serves as the primary interface between our Agentic AI pipeline and GridDB, handling all interactions with the database.
Let’s look at a few code snippets to understand how GridDB is used in this project.
Save vision record
The saveVisionRecord function is called by the Vision Agent to store its AI analysis of an image in GridDB.
export async function saveVisionRecord(
  griddb: GridDB,
  imageId: string,
  vision: VisionResult,
): Promise<void> {
  await griddb.insert({
    containerName: CONTAINERS.vision,
    data: {
      image_id: imageId,
      description: vision.description,
      objects: encodeJson(vision.objects),
      scene: vision.scene,
      style: vision.style,
      colors: encodeJson(vision.colors),
      concepts: encodeJson(vision.concepts),
      mood: vision.mood,
      created_at: nowIso(),
    },
    schema: STOCKPILOT_SCHEMAS.vision,
  });
  logAgent('griddb', 'saved vision', { imageId });
}
The schema parameter ensures that the data is validated against the vision schema before insertion. This data is later used by the Metadata Agent to generate stock photo metadata.
The save vision method internally will called griddb.insert() to insert the data into the vision container. This comes from the npm package @junwatu/griddb-client.
Get Metadata
This is the getMetadataRecord function that retrieves a metadata record from the metadata container in GridDB.
There are other functions in griddb-store.ts that handle other database operations, but this function is important because it contains the category and keywords data from image AI analysis.
export async function getMetadataRecord(
  griddb: GridDB,
  imageId: string,
): Promise<MetadataResult | null> {
  const row = await griddb.selectOne<Record<string, unknown>>({
    containerName: CONTAINERS.metadata,
    where: `image_id = '${imageId}'`,
  });

  if (!row) {
    return null;
  }

  return {
    title: String(row.title ?? ''),
    description: String(row.description ?? ''),
    category: Number(row.category),
    keywords: decodeJsonArray(row.keywords, 'keywords'),
  };
}
The function will get the metadata record from the metadata container in GridDB based on the imageId, and the returned data will be used by the pipeline to make the Export Agent save the metadata into a CSV file.
API server
StockPilot exposes its agent pipeline over HTTP so a UI client can trigger scans and read results from GridDB.
We use Fastify to expose the pipeline to a UI client. GridDB initialization runs on server start only, not per request.
API routes
| Method | Path | File | Purpose |
|---|---|---|---|
GET |
/api/health |
routes/health.ts |
Liveness + GridDB container status |
POST |
/api/pipeline/scan |
routes/pipeline.ts |
Run full agent pipeline on one image |
GET |
/api/images/:imageId |
routes/images.ts |
Read vision + metadata from GridDB |
Base URL: http://localhost:3000, but you can easily override by changing PORT or HOST in .env.
The code for server routes can be found in the server/src/server/routes directory. For example, the code in routes/images.ts is responsible for the /api/images/:imageId route:
export async function registerImageRoutes(
  app: FastifyInstance,
  ctx: AppContext,
): Promise<void> {
  app.get<{ Params: { imageId: string } }>('/api/images/:imageId', async (request, reply) => {
    const { imageId } = request.params;

    const [vision, metadata] = await Promise.all([
      getVisionRecord(ctx.griddb, imageId).catch(() => null),
      getMetadataRecord(ctx.griddb, imageId),
    ]);

    if (!vision && !metadata) {
      return reply.status(404).send({ error: `No records for image_id=${imageId}` });
    }

    return {
      imageId,
      vision,
      metadata: metadata
        ? {
            ...metadata,
            categoryName: categoryName(metadata.category),
          }
        : null,
    };
  });
}
The code will fetch the vision and metadata records from GridDB and return them as a JSON response than expose the data to the UI client.
Example Response
For a request to /api/images/123e4567-e89b-12d3-a456-426614174000, the response might look like this:
{
  "imageId": "123e4567-e89b-12d3-a456-426614174000",
  "vision": {
    "description": "A golden retriever playing with a ball in a park",
    "objects": ["dog", "ball", "grass"],
    "scene": "outdoor, park",
    "style": "photorealistic",
    "colors": ["golden", "green"],
    "concepts": ["joy", "playfulness"],
    "mood": "happy"
  },
  "metadata": {
    "title": "Golden Retriever Playing Fetch",
    "description": "A happy golden retriever catches a ball in a sunny park.",
    "category": 5,
    "keywords": ["dog", "golden retriever", "play", "park", "summer"],
    "categoryName": "Animals"
  }
}
AI Inference
All this functionality won’t be successful without the help of AI models. In this project, we use the GMI Cloud provider to provide the Qwen3.5 models.
The gmi.ts is the bridge that connects our agents with the AI models. Since the GMI Cloud API supports OpenAI API, we can easily use the openai package to interact with the Qwen3.5 models.
export function createGmiClient(): OpenAI {
  const apiKey = process.env.GMI_CLOUD_API_KEY;
  if (!apiKey) {
    throw new Error('GMI_CLOUD_API_KEY is not set in apps/.env');
  }

  return new OpenAI({
    apiKey,
    baseURL: GMI_BASE_URL,
  });
}

export async function chat(
  client: OpenAI,
  model: string,
  messages: OpenAI.Chat.Completions.ChatCompletionMessageParam[],
  options?: { json?: boolean; maxTokens?: number },
): Promise<string> {
  const response = await client.chat.completions.create({
    model,
    messages,
    max_tokens: options?.maxTokens ?? 1024,
    temperature: 0,
    ...(options?.json ? { response_format: { type: 'json_object' } } : {}),
  });

  const content = response.choices[0]?.message?.content;
  if (!content) {
    throw new Error(`Empty response from model: ${model}`);
  }

  return content;
}
The above code basically creates a connection to the GMI Cloud API and provides a chat function to interact with the Qwen3.5 models.
If you want to change to another similar model, you can simply update the config/models.json file.
{
  "visionModel": "Qwen/Qwen3.5-35B-A3B",
  "metadataModel": "Qwen/Qwen3.6-Plus",
  "keywordLimit": 49,
  "compress": true,
  "quality": 95
}
User Interface
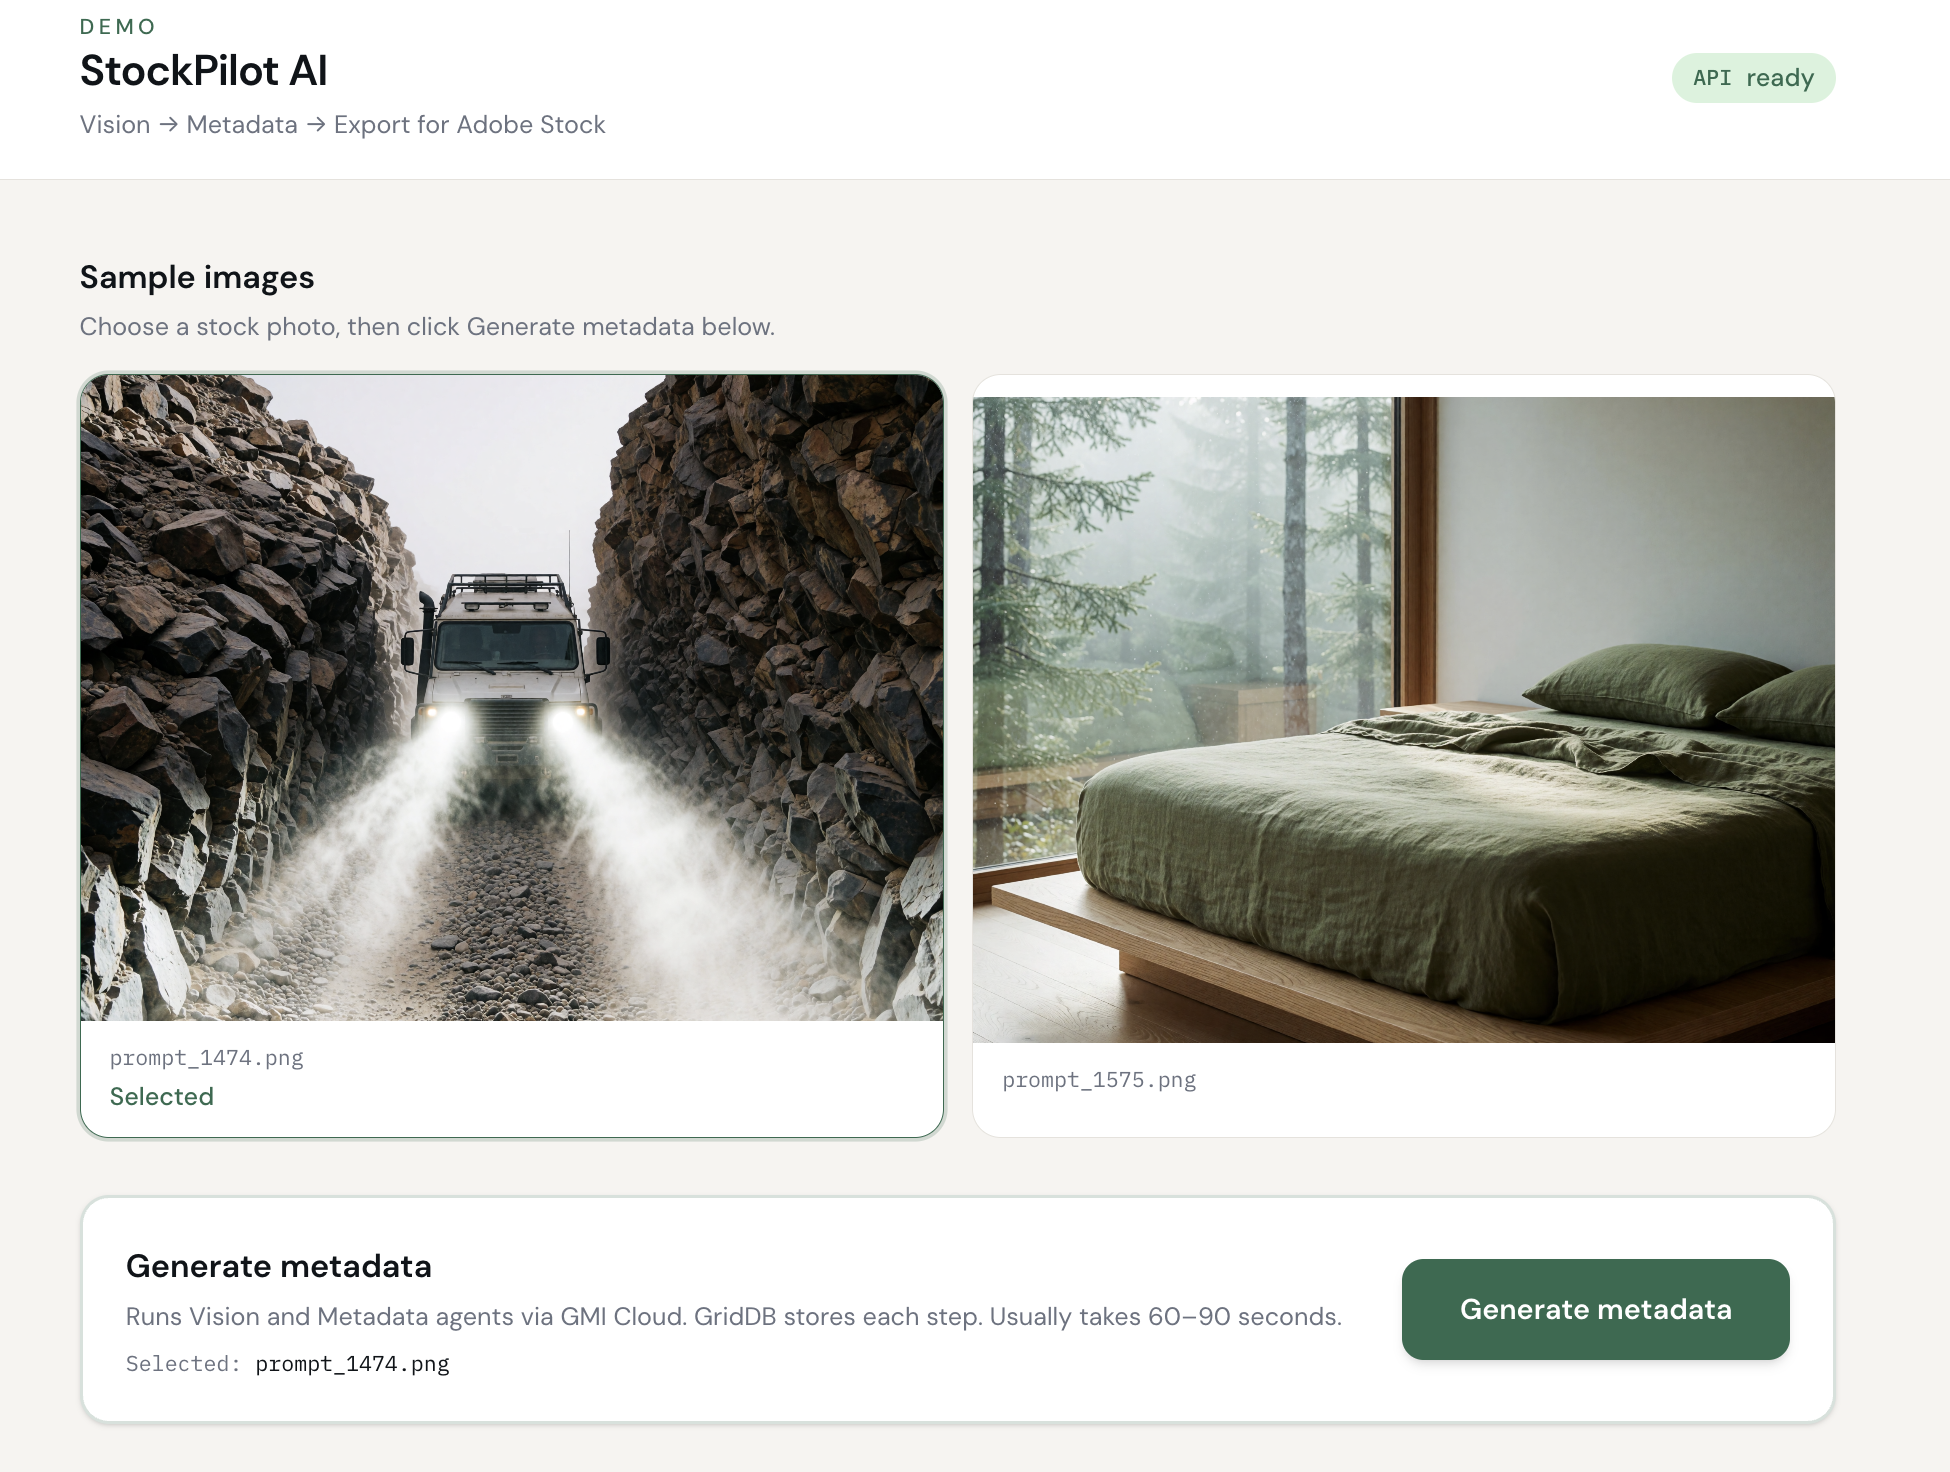
The app allows users to select an image from the gallery and submit it for vision and metadata extraction.
The UI flow is simple:
Users can select an image from the gallery and submit it for vision and metadata extraction by clicking the “Generate metadata” button.
All connections to the server are centralized in apps/web/src/api/client.ts. This file acts as the API client layer, abstracting all HTTP requests to the backend. So, every operation on the server is handled through this code.
This is the main code that triggers the server pipeline to extract vision, metadata, and export the results as CSV for a single image.
export async function scanImage(filename: string): Promise<ScanResponse> {
  const response = await fetch(`${API_BASE_URL}/scan`, {
    method: 'POST',
    headers: { 'Content-Type': 'application/json' },
    body: JSON.stringify({ filename }),
  });
  if (!response.ok) throw new Error('Scan failed');
  return response.json();
}
Basically, this function sends a POST request to the /api/pipeline/scan route and returns the server’s response:
{
  imageId: string;          // UUID of the image
  vision: VisionResult;     // Vision Agent output (description, objects, etc.)
  metadata: MetadataResult; // Metadata Agent output (title, description, etc.)
}
Later, this response is processed by the frontend to display the results to the user.
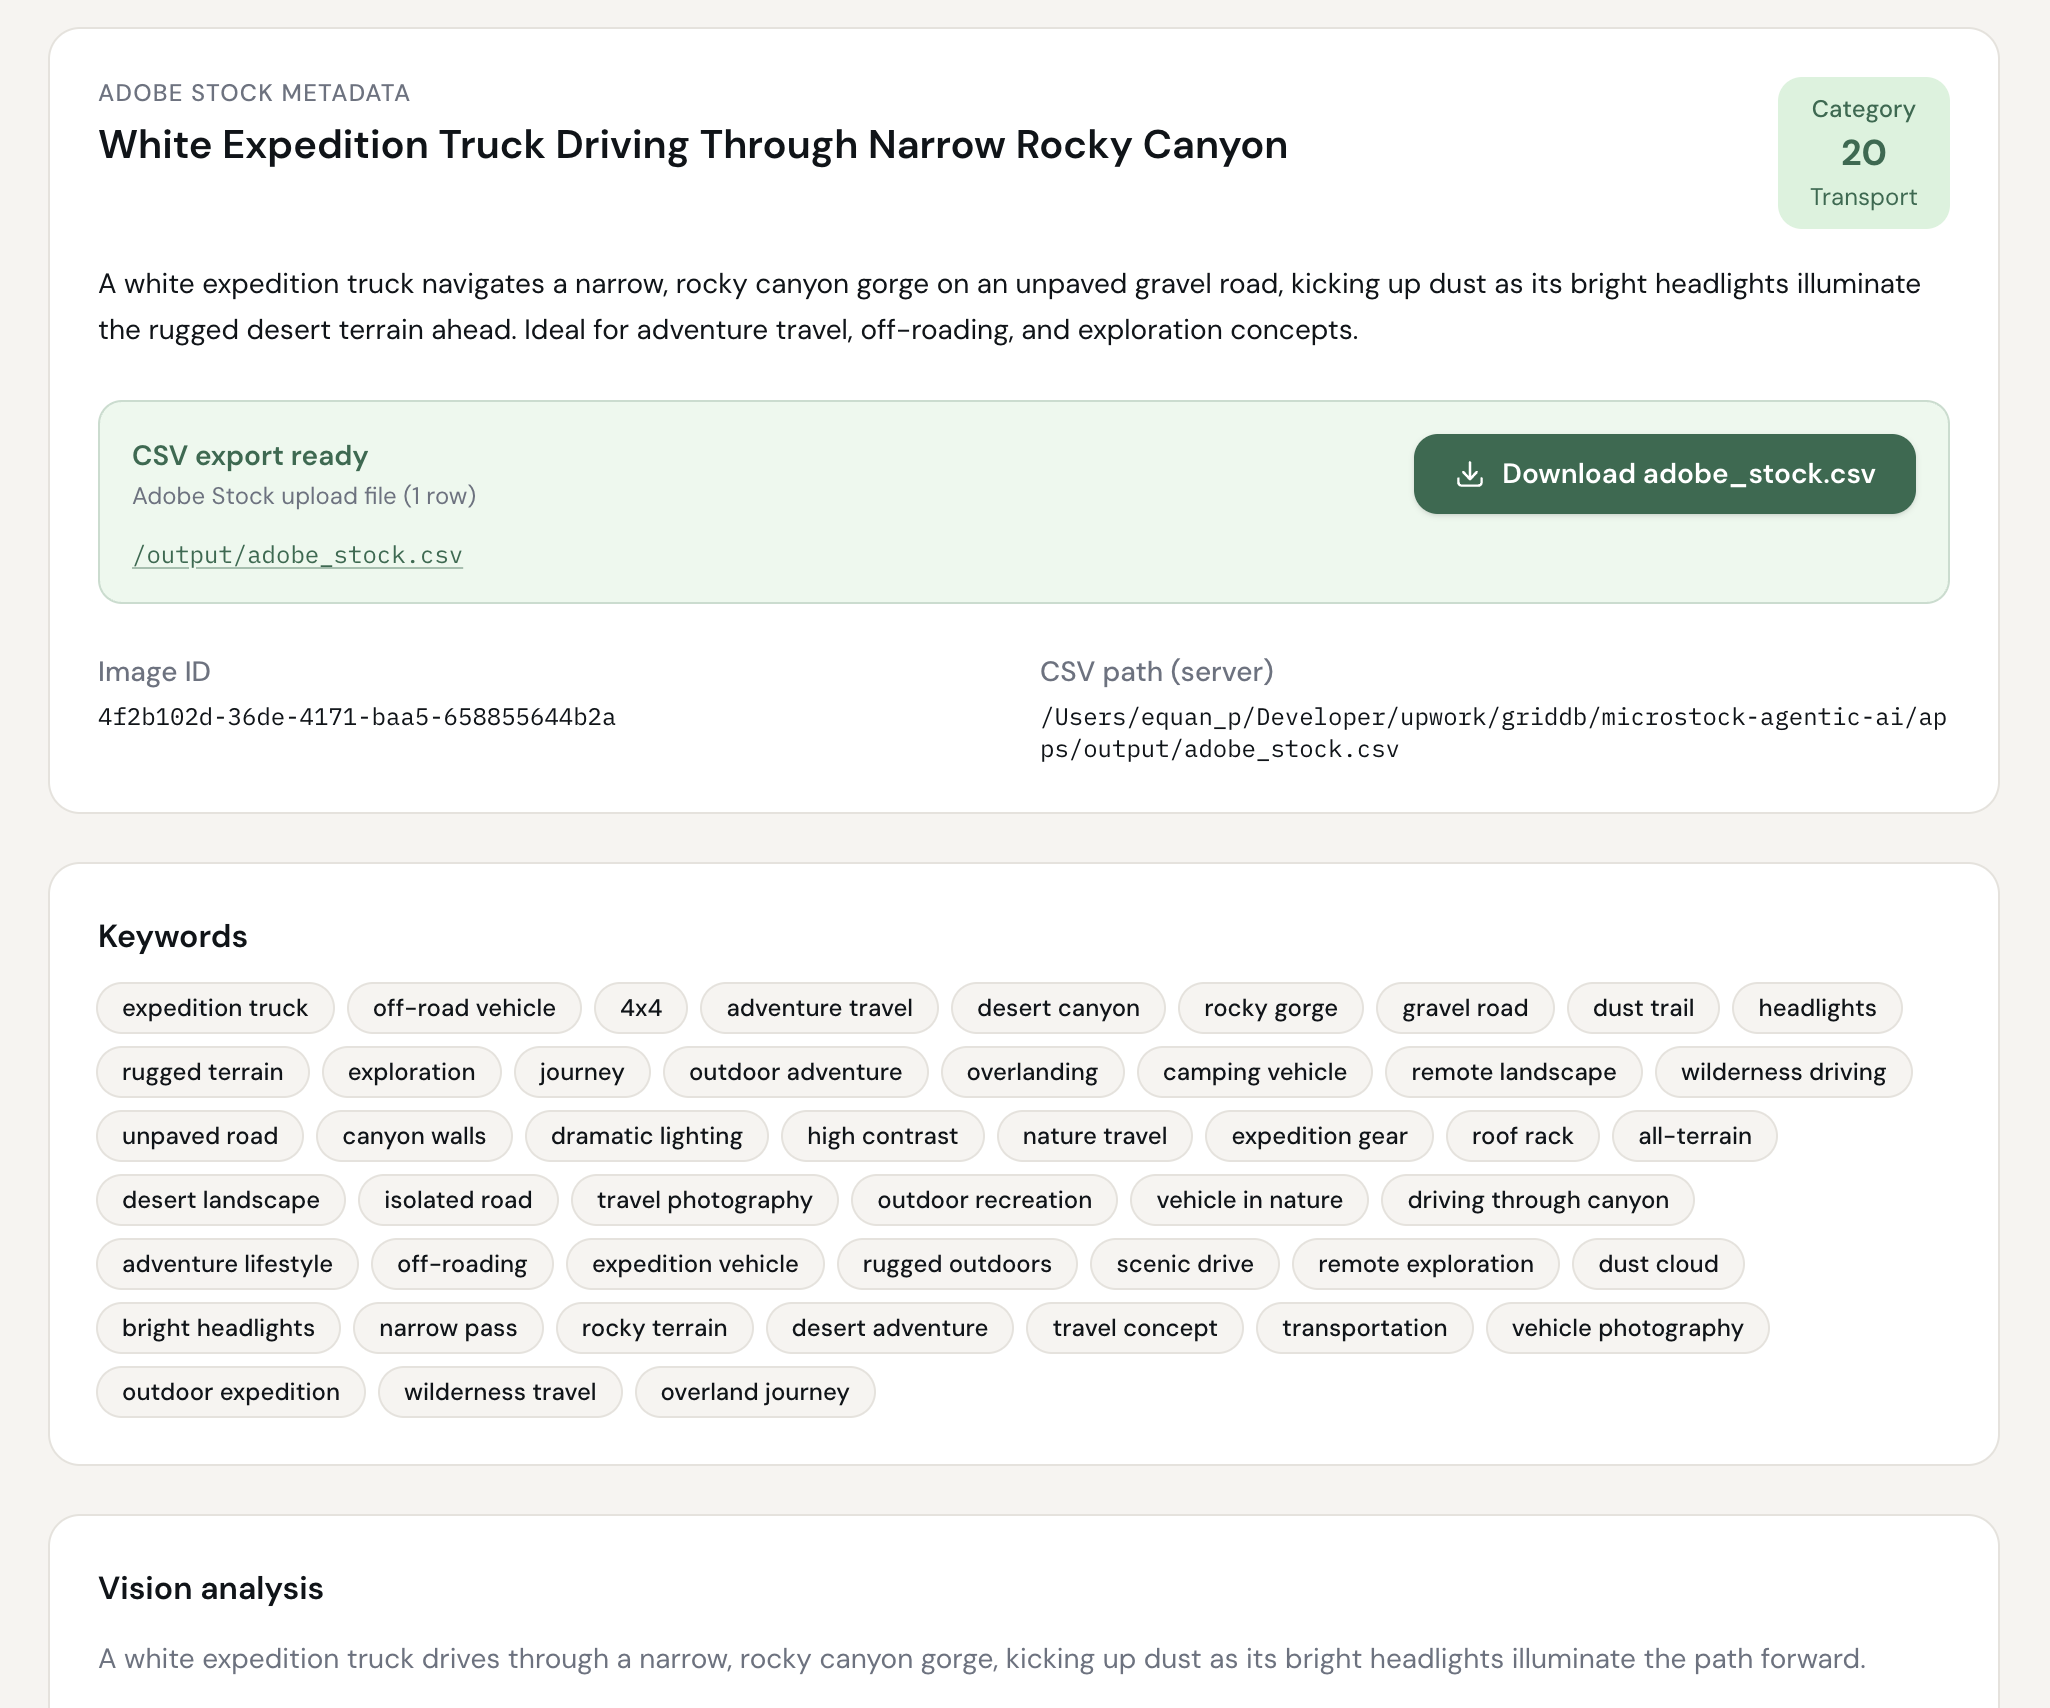
Result Panel
This panel displays the vision and metadata results after the image is submitted and also the CSV result file.
Further Enhancements
For further enhancements, a production build would add:
- Upload Interface so users can upload any images.
- Reviewer Agent to check quality score.
- Similarity Agent to reuse past metadata via GridDB search.
- Batch for many images processing.